Quick Start Guide: Size Limit Builder

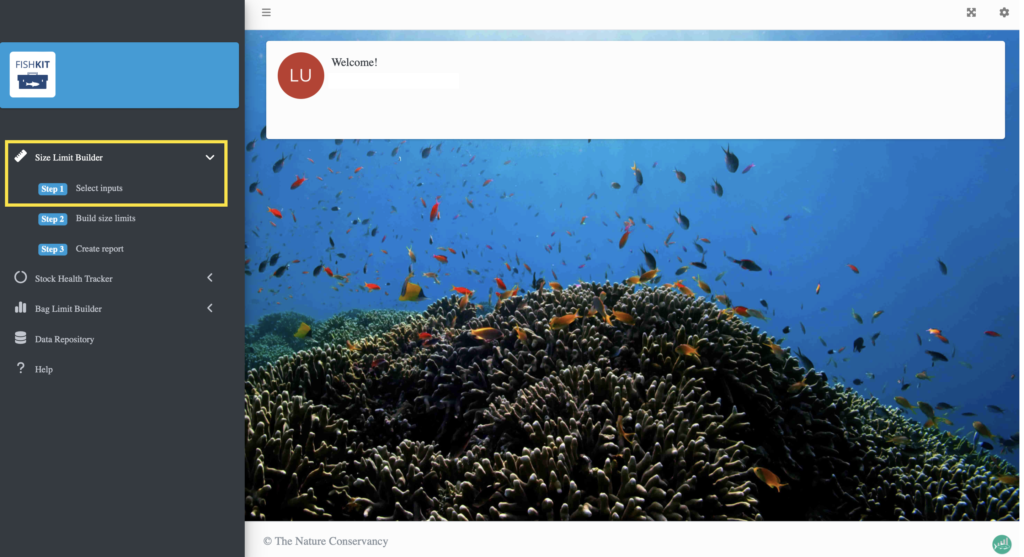
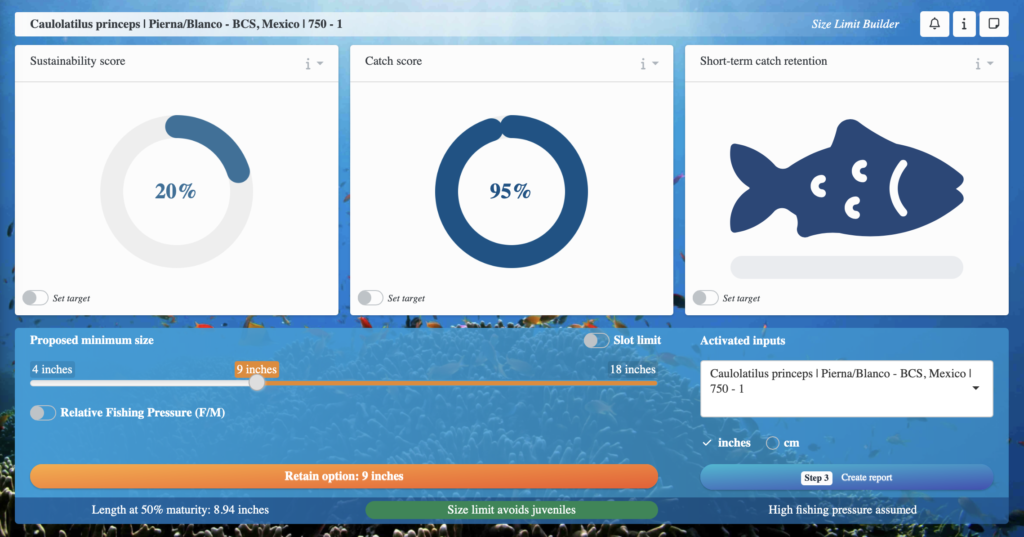
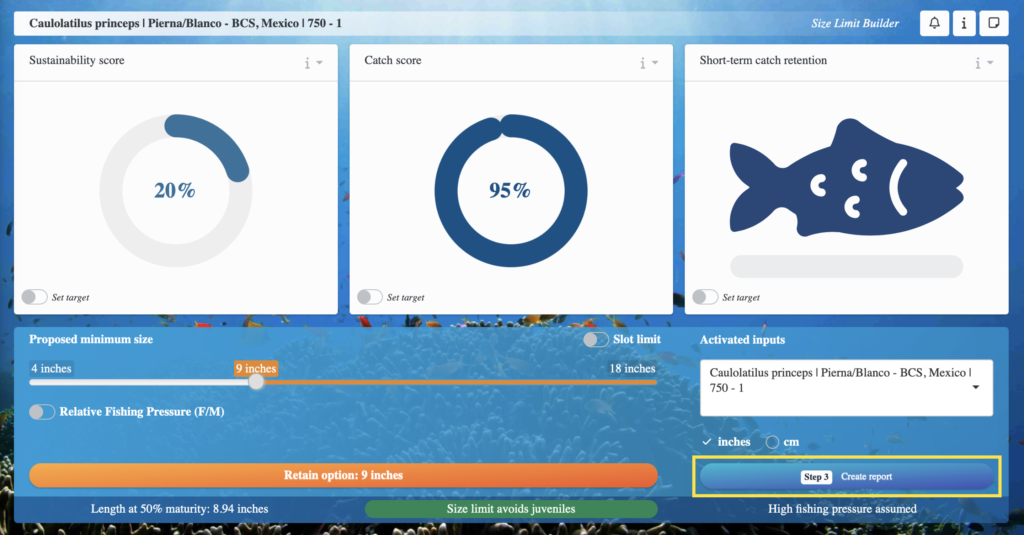
Here we’ll walk through the basic steps to get started creating size limit options with the Size Limit Builder. As a reminder a minimum size limit sets the minimum size fish must be before they are allowed to be harvested. The Size Limit Builder can help users to evaluate tradeoffs between sustainability and catch associated with different size limit options. Let’s get started!

1. Create an account

First, you’ll need to either log in or create an account with https://natureanalytics.ca/FishKit/.

2. Select inputs

Once you’re into the app, on the left hand side click on the “Size Limit Builder” section. Then, click on “Step 1 Select inputs.” This will walk you through all the information you need to select to use the Size Limit Builder.

A screenshot of the FishKit Size Limit Builder app, showing Step 2 of the process for using the Size Limit Builder

3. Select life histories

Click “Advance to life history.” Here you can browse through all the life histories available in the public repository. Once you find the life history you’d like to use, select it in the table, and then click the “+” button in the bottom right corner to view the life history.

You should now see a window containing the “main summary” of the life history. You can also select “version history” and scroll down to see the parameters themselves.

Once you’ve decided that you would like to use the selected life history for analysis, click “Activate” in the top menu bar. 

A screenshot of the FishKit app showing how to preview life histories and activate them for the Size Limit Builder (step 4 of the Size Limit Builder Quick Start Guide)

Note that if you had length data or fishery selectivity information, you can add those in by selecting their respective tabs on the top menu. However, they are not necessary to use the Size Limit Builder. 

If you are interested in creating a new life history, to submit information you’ve gathered on a species of interest, you can go to the “Data repository” button on the left menu. This option requires that you have well documented information on the species life history as well as an intermediate understanding of fish biology. Instructions on creating a life history will be documented and posted separately on our resources page.

4. Activate the life history

Make sure the life history you want to use is selected from the “Life history” dropdown menu. Then click “Activate.”

5. Explore the Size Limit Builder dashboard

Once you’ve activated the life history, you’ll get this alert. The blue check mark tells you the selected life history has sufficient data to be used in the Size Limit Builder. Click anywhere on your screen to dismiss it. Then, click “Step 2 Build size limits.” 

A screenshot of the FishKit app showing a successful life history activation (step 6 of the Size Limit Builder Quick Start Guide)

Now you have entered the Size Limit Builder. The life history you selected should be listed along the top of the page. 

The orange slider and button indicate the size limit automatically selected, which is set just above the length at 50% maturity. Above are two dials representing the “Sustainability score” and “Catch score” associated with this size limit. 

The “Sustainability score” represents the population’s ability to replenish itself on a scale of 0-100%, and is also known as Spawning Potential Ratio (SPR). Optimal values for this metric vary for different species, but under sustainable harvest, values ranging from 20%-40% are generally expected. 

The “Catch score” represents the relative catch score for the entire fishery on a scale of 0-100%. This metric is also known as Yield-per-recruit (YPR). A value of 100% represents the theoretical maximum sustainable yield for the population, while a score above 80% could be considered a pretty good yield. 

6. Retain size limit options

As you move the orange slider you can view different size limits and their respective scores. Once you’ve landed on a score that you’d like to retain, click on the orange “Retain option” button to save that size limit option. Once you’ve retained an option, you can scroll down to see it displayed below. 

A screenshot of the FishKit app Size Limit Builder dashboard showing where size limit options are retained (Step 7 of the Size Limit Builder Quick Start Guide)

You can repeat this process for as many species and size limits as you like, while the app retains your progress.

7. Document your progress

Once you’re satisfied with your session or ready to close out of the app, select “Step 3: Create report” to export a PDF detailing your session. 

A screenshot of the FishKit app Size Limit Builder dashboard showing where to click to build a report (step 8 of the Size Limit Builder Quick Start Guide)

Make sure your desired life history is selected, and add a report title and author(s) if you’d like. If you’re willing to share your report with the FishKit team, so we can get a better idea of how the app is being used, check “Yes” under “I agree to share the results of my FishKit session with the FishKit team.” Then, select what you’re using the tool for from the dropdown menu. Lastly, click the orange “Create report” button, which will download the report to your computer. 

You can repeat this process for as many species and size limits as you like, while the app retains your progress.

That concludes the overview of the Size Limit Explorer’s basic functionality! Please visit our resources page for more helpful information and tutorials.