Life History information
Explore the public life history repository and learn how to create new life histories.
Explore the public repository
This section walks through the steps for exploring the public repository of life histories.
Relevant Modules:
C. Explore the public repository
To view and browse the repository, you have several options. You can use the “Sort” dropdown menu to order life histories by creation date or common or scientific name. You can also view life histories in the default list format, in an image-driven grid format, or by taxonomic grouping by toggling between the buttons under the “Display” heading.
In the default list format, you can browse the life histories by clicking through the pages using the numbers at the bottom of the public repository. Alternatively, if you are looking for a specific species, you can type the name in the search bar. Note that multiple life histories may come up, as multiple life histories may exist for the same species, differentiated by unique ID numbers that were generated for a specific set of parameters. Allowing multiple life histories to exist for the same species is essential when there are multiple populations or stocks of the same species, where multiple valid estimates exist for life history parameters, or where multiple users are independently creating entries for the same species. However, note that you cannot modify life histories in the public repository, only the author who created the life history can edit and modify access.
Note that the life history repository is constantly growing as users and the FishKit team enter more life histories; however, not all species have an associated life history in FishKit. If you are looking for a specific species and are not seeing a life history, you can always check back in the future. Alternatively, if you have the necessary information and an intermediate understanding of fish biology, you are welcome to create and save your own life history in the Data Repository for use in FishKit analyses.
Relevant Modules:
D. Review life histories
Once you have found a life history you would like to learn more about, click on it. This will bring up a new tab containing all of the information about the life history. Within the life history, you will see a “Main summary” tab with basic descriptive information, and a “Version history” tab with information about the version, how data were obtained, and the quantities assigned to each parameter by the author of the life history.
If multiple versions of a life history exist, you can toggle between the versions under the “Version history” tab on the left hand menu.
Note that the Data Repository enforces version control for each life history. This means that when the author of a life history chooses to edit quantities assigned to each parameter, these edits are saved as a new version. This ensures that all analyses performed in FishKit are reproducible and that edits can be tracked and are fully transparent to users of the public repository.
To return back to the public repository list, click the “Close” button in the upper left corner.
Note that all the life histories that appear in the life history repository are also accessible within the Stock Health Tracker and Size Limit Builder. If you find a life history that you would like to use with one of those tools, navigate to the tool in the FishKit app, search for, and activate the life history there.
Steps for creating a life history
This section walks through the steps for creating a new life history in the Data Repository. Creating a life history allows you to use it in the Stock Health Tracker and Size Limit Builder.
Note that this section is geared towards technical users trained in fisheries science.You will need well documented information on the species’ life history, as well as an intermediate understanding of fish biology.
- Learn about life histories in more detail
A. Enter the Data Repository
After you have logged in to the FishKit app, on the left hand menu, select “Data Repository.” Then, on the main screen, click the “FishKit Data Repository” button. This takes you to the separate Data Repository application.
Note that all the life histories that appear in the life history repository are also accessible within the Stock Health Tracker and Size Limit Builder. If you find a life history that you would like to use with one of those tools, navigate to the tool in the FishKit app, search for, and activate the life history there.
Relevant Modules:
B. Input your species
Select “Life history” from the menu on the left. Then, from the dropdown menu, select “Create new.”
Start by entering the Genus and species name for your life history. Then, click “Build a life history interface” in orange.
The Data Repository will load and then tell you if your species was found in FishBase or SeaLifeBase. Reviewing whether your species was found in FishBase or SeaLifeBase is a useful error check to ensure that the scientific name of your species has been entered correctly. Further, information from FishBase is retrieved via an automatic connection between FishKit and FishBase, and it is presented in the subsequent steps in creating a life history. Life history parameters are retrieved from FishBase using the R package rfishbase (Boettiger et al. 2012). Currently, FishKit does not retrieve information on invertebrate life histories from SeaLifeBase. FishBase information can be used during the process of creating a life history to help specify life history information, but note that you are cautioned to conduct your own review and research of life history information to ensure specification of reliable parameter values.
Relevant Modules:
C. Enter length parameter settings
Below the FishBase and SeaLifeBase rows, you will see a step-by-step form for entering in the necessary parameters. While it is not strictly required to follow the steps in the order presented, it is good practice to do so.
Note that all parameter inputs must be entered in centimeters (cm) when life histories are created.
Start by entering information in the “Length parameter settings” box.
Relevant Modules:
Step 1. Master length type
You’ll enter the master length type in Step 1. Select a master length type from the list, making sure your selection corresponds with your length parameters. Master length type specifies how length of a fish (or other organism) is defined for all length-related parameters. Because life history studies often utilize different length types (e.g., total length versus fork length), this field helps the user to avoid erroneously specifying various parameters in misaligned length types. It may be helpful to choose a length type that aligns with fishery regulations, thus allowing for more straightforward analysis in FishKit.
How do I ensure my parameters have the same length type? Reviewing the original source material for the parameter estimate will reveal its associated length type. Additionally, established mathematical relationships for converting between length types are often available on FishBase, which will allow you to convert between length types and produce conformity across parameter inputs. It may also be helpful to choose a length type that aligns with fishery regulations, thus allowing for more straightforward analysis in the FishKit Toolkit.
Relevant Modules:
Step 2. Length-weight conversion
Then, in Step 2, enter in the length-weight conversion alpha and beta values. This information is used in calculating quantities related to biomass or weight in the catch. If you do not specify alpha and beta values, analyses in FishKit will assume isometric growth, resulting in relative weight being equal to the cube of length. See the “Supporting information” tab for information imported from FishBase.
Relevant Modules:
Step 3. von Bertalanffy
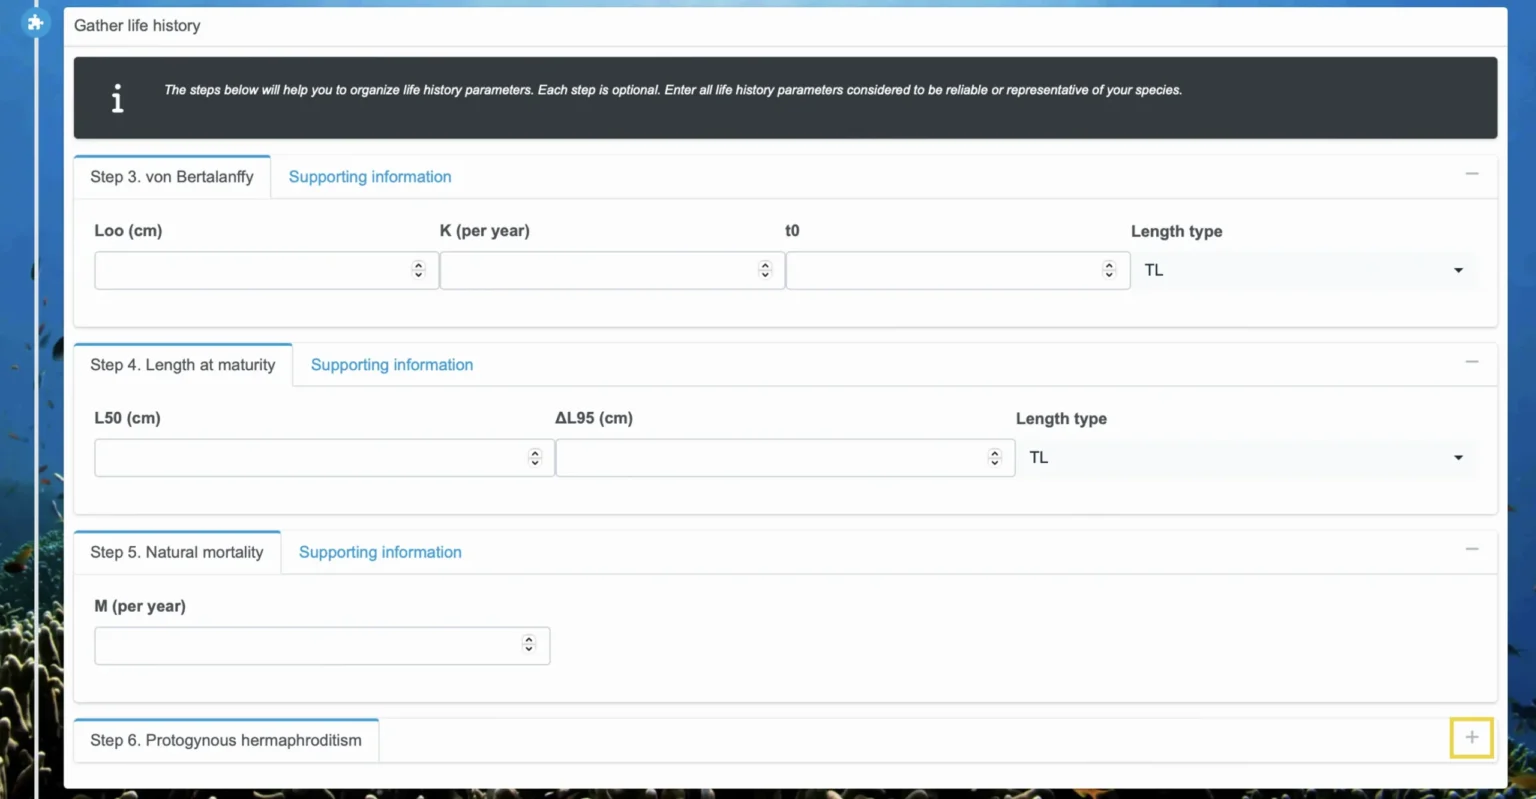
In Step 3, you will enter von Bertalanffy information, which calculates length-at-age. Enter asymptotic length (Loo) in cm, growth rate (K) by year, t0, and the length type. Life histories should only be specified if it is reasonable to assume that growth approximates the shape of the von Bertalanffy growth curve.
It is possible that you will be unable to specify all of the von Bertalanffy parameters. It is not required to specify t0; however, if you leave it unspecified, FishKit analyses will assume a value of 0. Specifying both Loo and K is required for using the Size Limit Builder. Only Loo is required for a length-based spawning potential ratio analysis in the Stock Health Tracker, but both Loo and K are required for other Stock Health Tracker metrics.
Relevant Modules:
Step 4. Length at maturity
Then, in Step 2, enter in the length-weight conversion alpha and beta values. This information is used in calculating quantities related to biomass or weight in the catch. If you do not specify alpha and beta values, analyses in FishKit will assume isometric growth, resulting in relative weight being equal to the cube of length. See the “Supporting information” tab for information imported from FishBase.
Relevant Modules:
Step 5. Natural mortality
In step 5, you will enter natural mortality information, M by year. This should be specified as an instantaneous rate per year. Also note that M can be specified as a correlate of other life history parameters. In this step, the “Supporting information” tab contains a helper algorithm based on common approaches for estimating natural mortality. This helper algorithm considers inputs from other steps, such as Step 3. von Bertalanffy, as well as those inputs listed under its optional parameter inputs (e.g., M/K, Maximum age, and Temperature). Based on available inputs, a list of available natural mortality estimates is updated and can be manually entered in the field labeled “M (per year).”
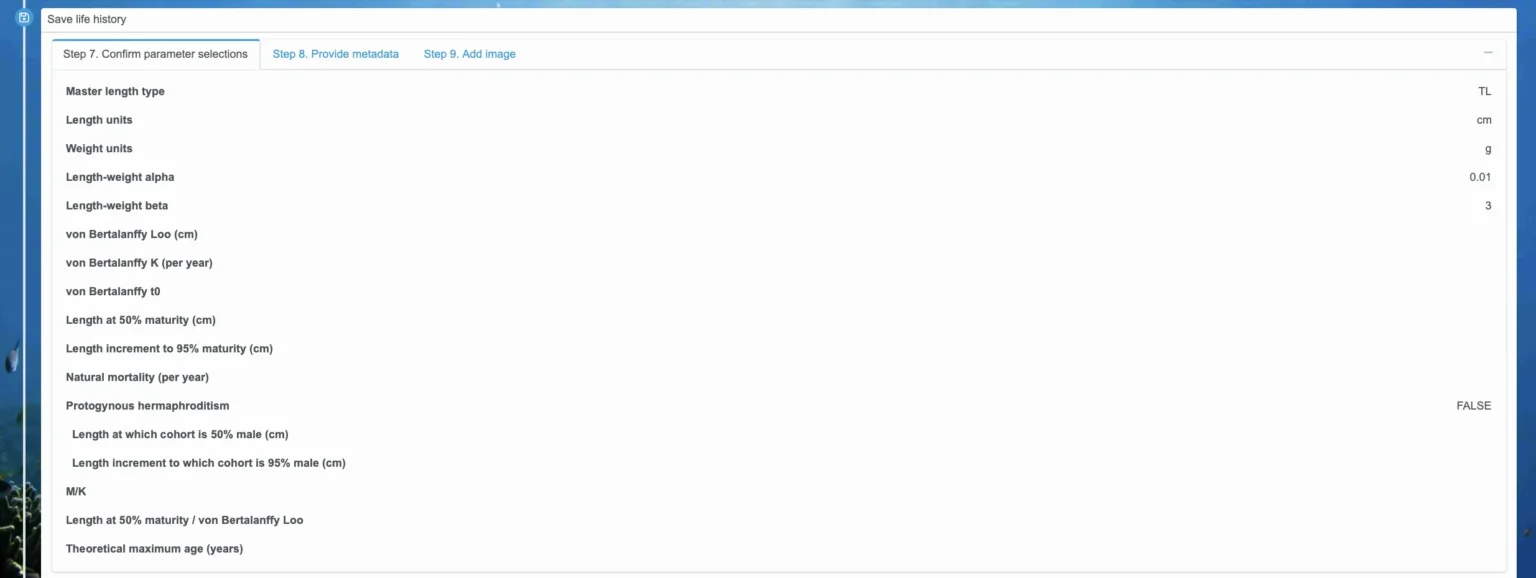
Also note that you can optionally save a value for the M/K ratio and observed maximum age. When available, preference should be given for specifying M and K separately to produce full functionality within FishKit Toolkit. When M and K are specified separately, these values are used to calculate the M/K ratio in the saved life history (see Step 7. Confirm parameter selections). However, if M is not specified and M/K is specified, the ratio of and will be saved instead of M. This feature was enabled to allow some features in FishKit toolkit to remain accessible, including LBSPR, in absence of specification of separate estimates of M and K.
Relevant Modules:
Step 6. Protogynous hermaphrodite (optional)
Relevant Modules:
E. Quality scoring
Relevant Modules:
Spatial representativeness
Relevant Modules:
Temporal representativeness
From when is the data used to estimate the parameter?
This category relates to the period of time from which the data was collected that is used to estimate the parameter. Because some parameters can change over time, our emphasis on data-limited approaches typically necessitates that parameters should be as recent as possible, and newer data collections are rewarded with higher scores. Score from longer than four decades (score 0) to within one decade of present (highest score 4).
Relevant Modules:
Taxonomic proxy
Is the data pertained to the species of interest or taxonomic proxy used?
This category considers whether the data used to estimate the parameter was directly obtained from the species of interest, or whether a taxonomic proxy was used. Sometimes it is not possible to estimate a life history parameter for the stock, subspecies, or species of interest, so an estimate may need to be “borrowed” from some proxy stock or species. Higher scores are rewarded when the parameter was produced from the species of interest, with scores ranging from 0 corresponding to shared taxonomic order proxy, to same family (1), same genus (2), different stock of same species (3), and no proxy used (highest score 4).
Relevant Modules:
Uncertainty characterization
Does the parameter include uncertainty and how is uncertainty estimated?
While FishKit allows only point estimates to be entered, it remains useful to examine the degree to which the production of the parameter explicitly considered uncertainty. Here, uncertainty refers to observation error (including measurement error and sampling error), demographic stochasticity (i.e., natural variability) and model misspecification. Uncertainty scoring reflects the statistical form in which uncertainty is conveyed, with the lowest score for production of a point estimate where no uncertainty is included (score 2), to the highest score (score 4) for production of an informed distribution.
Relevant Modules:
Validation
Has the parameter been compared with other independent parameters?
This category relates to whether the parameter(s) have been compared with other independent parameters, as a means of cross-check for validity or accuracy. If no comparisons were performed by the user or within the original source information (e.g., scientific paper), then it gets the lowest score (score 0), and higher scores are rewarded if comparisons are made based on spatial, temporal, and taxonomic relevance.
Relevant Modules:
Specificity
Does the parameter vary by life stage (e.g. size and/or age)?
While FishKit allows only point estimates to be entered, it remains useful to know if the parameter could be expected to vary during the life cycle of the species. For example, none of the life history parameters in FishKit in Data Repository require specification by life stage, but the user should search for this information in the original source. If no consideration was given to parameter variation by life stage, then the score is 0. Highest score (score 4) is awarded when parameter specification is detailed by life stage or parameter deemed to be invariant by life stage.
Relevant Modules:
Empirical basis
Relevant Modules:
Scoring calculations
Relevant Modules:
F. Save life history
Step 8. Provide metadata
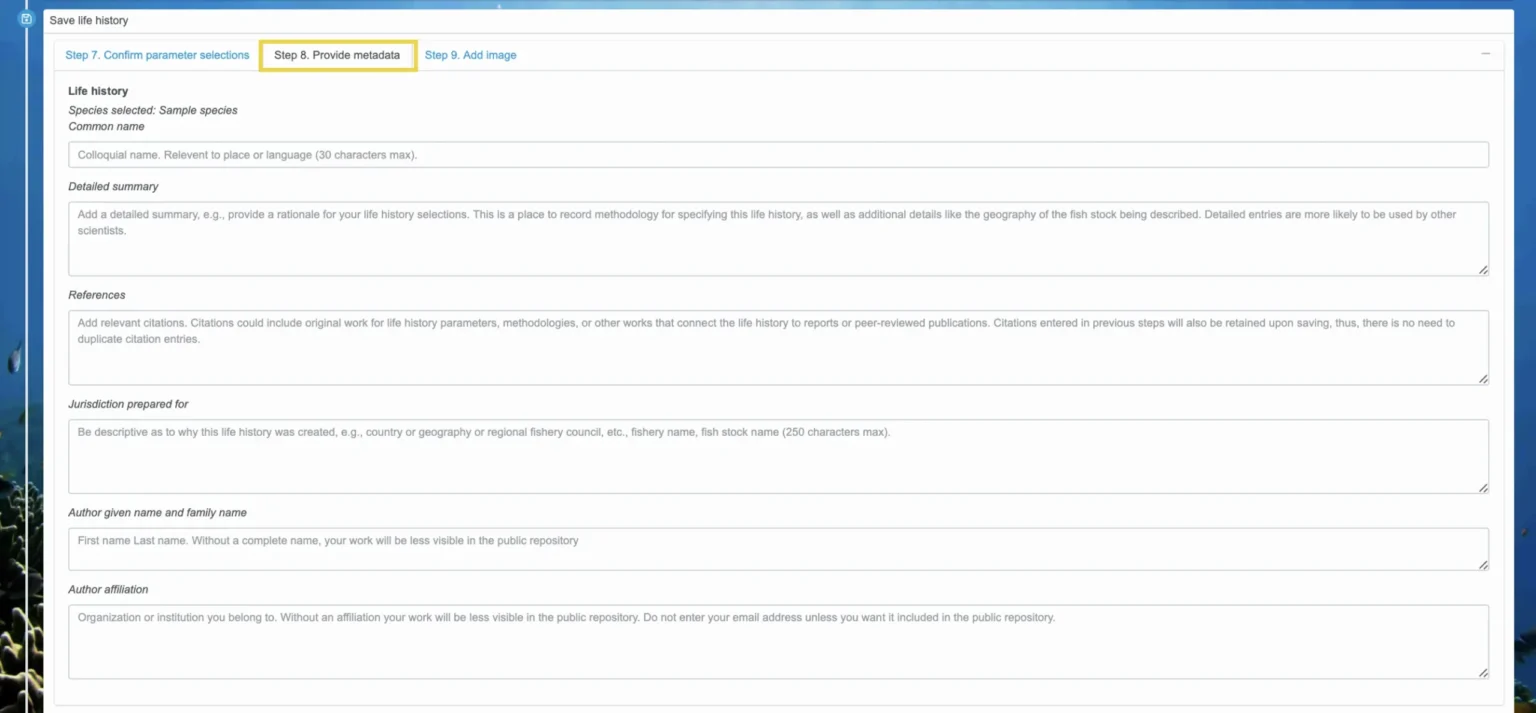
Once all the parameters look correct, select the “Step 8. Provide metadata” tab. Here, enter in the common name for the species, a detailed summary, any relevant references, the jurisdiction this life history is for, your full name, and your affiliation. See the gray text in each box for more details about the information you should enter, but this is the place to describe the rationale behind the specification of life history parameters and include citations. Providing thorough documentation is especially important if you plan to add the life history to the public repository for others to use or if you plan to make a report based on FishKit analyses.
Relevant Modules:
Step 9. Add image (optional)
Then, select the “Step 9. Add image” tab. This is optional, although highly recommended. Attach an image as a JPEG that does not exceed 5 MB if you would like to include a visual with your life history. The visual will be displayed whenever the life history is used in FishKit.
Relevant Modules:
G. Finalize and save life history
Then, read through the box “Ready to save your life history?”
Warnings: Warnings are presented when erroneous or questionable values are entered, and they must be resolved before you can save your life history. Some warnings include:
Length type mismatch with master: All length parameters must have the same length type (e.g., TL, FL, etc.) and this length type must match the selection made in Step 1. Master length type.
Please review parameters for implausible values: This warning captures errors related to implausible parameter values, typically negative numbers where negative numbers are not permitted. Note that not all implausible values will be captured by this warning, for example, an Linf value of 10,000 cm will not trigger a warning despite the implausibility of a 100 m length fish.
Please compare to growth parameters for inconsistencies: This warning captures problematic length parameters by comparing entries in Step 3 von Bertalanffy to Step 4 Maturity, and if applicable, Step 6 Protogynous hermaphroditism. For example, entering L50 value larger than Linf will produce this warning. Likewise, entering a combined L50 plus ΔL95 that exceeds Linf will produce this warning. Other similar disparities between growth parameters will produce this warning, and users should cross-reference length parameters to resolve.
Can this life history be used in subsequent analyses? Make sure the life history has the necessary information to be used in your desired subsequent analyses, as indicated by the blue checkmarks. If you see an orange “x,” like in this image, then there is not sufficient information for that particular type of analysis.
Then, select “Finalize and save life history” to save your life history for your future use. If you have any remaining warnings, you will be prompted to resolve those before saving.
You can continue to enter as many life histories in the Data Repository as you’d like! To view your life histories, click “Your life histories” in the menu on the left.
Relevant Modules:
H. Make life history publicly accessible (optional)
Note that saving your life history does not automatically make your life history available for public use. If you would like other FishKit users to have access to your life history, you will need to make your life history visible to the public repository.
On the left hand menu, select “My life histories.”
Then, select the life history you want to make public by clicking on it in the list. This will bring up a tab containing all the information about the life history. In the upper right corner, click on the “Add to public repository” button to make it public. As the author of a life history, only you can opt to make the life history publicly available. You can also remove a life history that you own from the public repository. Note that other users cannot edit or change the life history you created.
Relevant Modules:
I. Edit or modify the life history (optional)
If you want to make changes to your life history, you can do so by selecting “My life histories” from the left hand menu, and then clicking on the desired life history from the list.
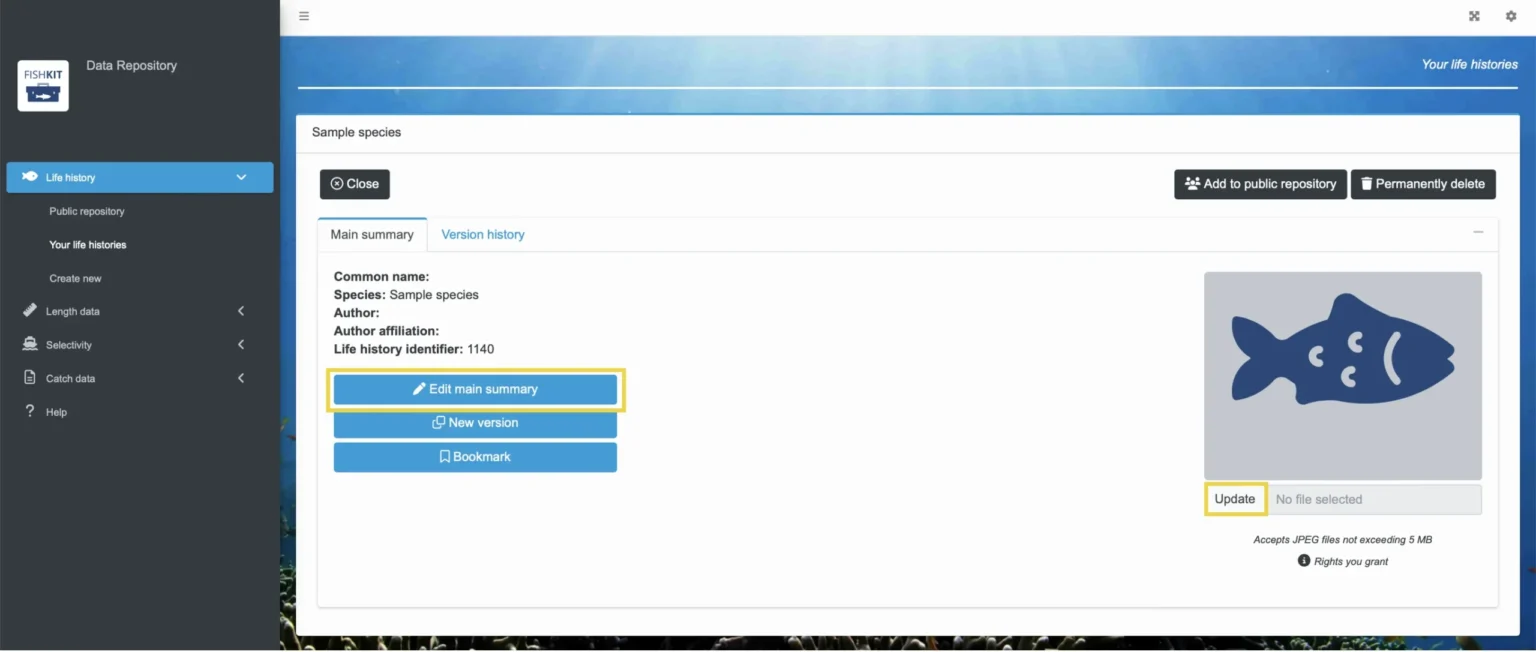
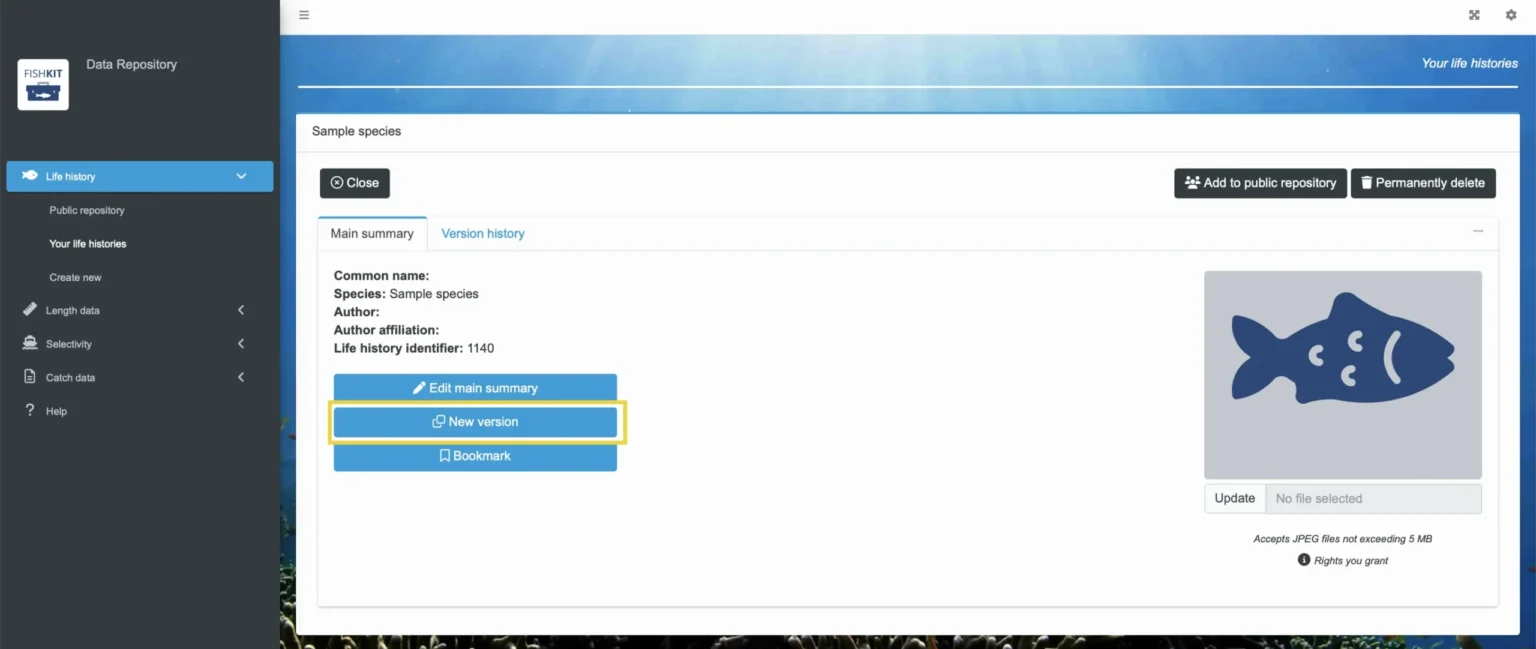
Then, under the “Main summary” tab, you have the option to “Edit main summary.” This lets you adjust the life history title, species name, author, and author affiliation. You can also click “Update” under the image to select a new image. Updates to the main summary and image are considered routine and are not linked to version control.
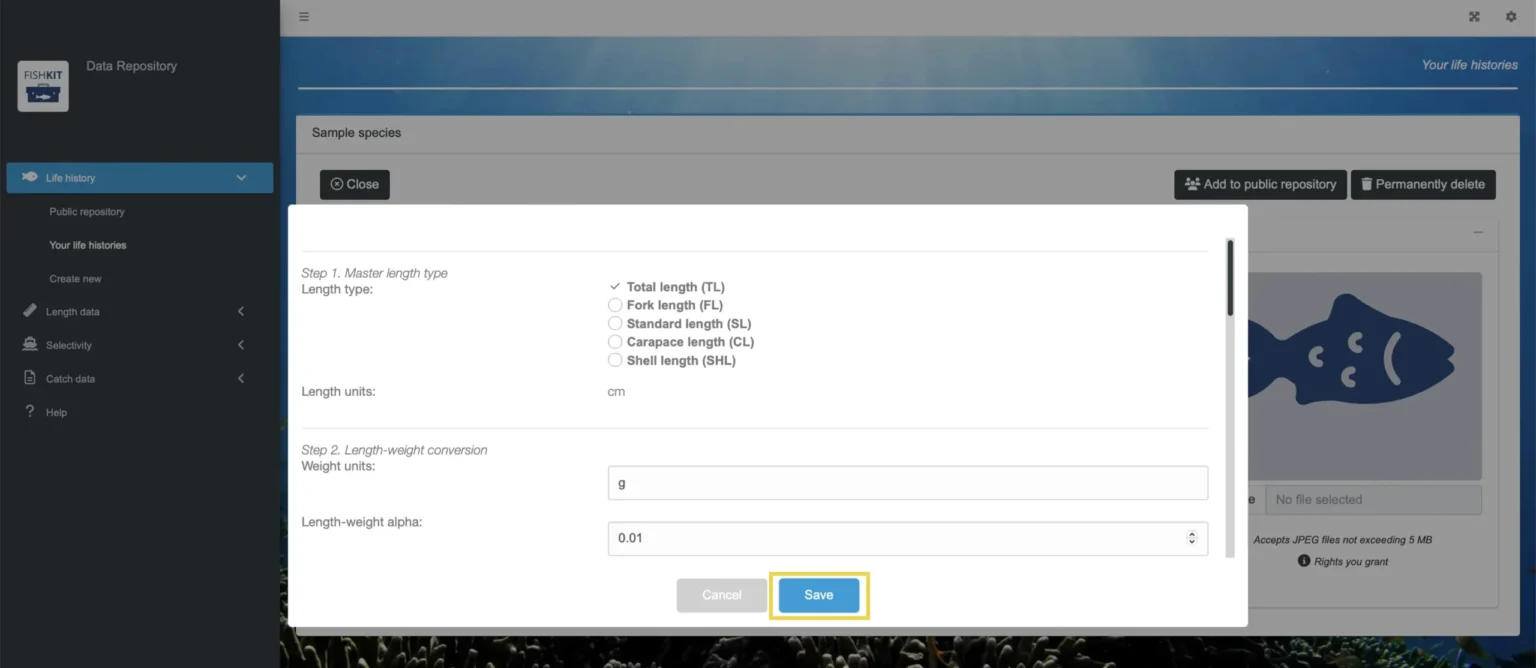
If you want to edit specific parameters within your life history, version control will be implemented. Select the ”New version” button to see and edit previous life history parameters.
When you are satisfied with your updates, click “Save.” This process will create a new version of the life history and assign the new version a unique identifier. Both the previous version(s) and the new version of the life history will be available in the repository and throughout the FishKit toolkit. Once you click on the life history, you can select which version you want to view or include in analyses.
The author of a life history retains control of editing. Editing and version control work together to ensure that changes to life history parameters are tracked to ensure that any analysis that uses a life history is reproducible and that edits to parameter values are transparent. Version control is implemented to track changes in specification of parameters of a life history. Upon initiating a new version, the user will be able to edit existing parameters and save. Like life history identifiers, version identifiers are assigned to each version and are themselves unique across all users and life histories. Version identifiers are incremented automatically and because they are unique, the initial version of a given life history is unlikely to begin with the number one and may not subsequent increment by one. However, when viewed in FishKit Data Repository or FishKit toolkit, version history will be presented in chronological order.
Relevant Modules:


